INSTALLATION
 REGISTRATION REGISTRATION
BEFORE YOU BEGIN
FONT EXCLUSIONS
CREATING AN IMAGE
STEP 1: LOAD IMAGE
STEP 2: ENTER TEXT
STEP 3: LETTER SIZE
STEP 4: OUTPUT IMAGE SIZE
STEP 5: OUTPUT IMAGE TYPE
STEP 6: OUTPUT LOCATION
STEP 7: OUTPUT FORMAT
STEP 8: CREATE ASCII ART
Installation
To install ASCIIsee, drag it to your Applications folder.
Registration
If you have purchased the Unlimited version of ASCIIsee, you will have received a serial number via email. After launching ASCIIsee, select Register... from the Application menu. Either copy and paste, or type the supplied serial number into the relevant field, then click the Register button. This will activate the unlimited functions of ASCIIsee.
Before you begin
The concept of ASCII art is not new. Images are created by substituting image pixels with plain text. Denser characters, such as the ‘@’ symbol are used to substitute dark pixels and lighter characters such as the ‘.’ are used to substitute light pixels.
ASCIIsee takes this concept a step further and uses the varying weights of different fonts to create the same effect. The main advantage of this method is that rather than building the final images from unintelligible characters, you can actually build your image with a custom message. Add to that the ability to create your images in full color, and we've now brought an ancient concept into the 21st century.
Unlike other ASCII art generators, the final output is actually an image. This is due to the fact that the fonts used are proportional, so they must be fixed into their required position.
For the best results, you will want a reasonable range of fonts installed on your computer, with a decent distribution of thin through to heavy weights. There's no need to install thousands of fonts, and you may find that you already have enough to achieve a decent result. The best thing is to test ASCIIsee and see how it goes.
Font exclusions
Some fonts don't contain latin characters and are of an entirely decorative nature, such as ‘Zapf Dingbats’ and ‘Wingdings’. Although these fonts could certainly assist in providing a decent range of density, they will render any message you type unreadable, so need to be excluded from use in the creation of your ASCII art.
To do this, select Font Exclusions from the Edit menu (Apple-L). ASCIIsee will now generate a list of fonts installed on your computer. Depending on how many fonts you have installed, this may take a little while.
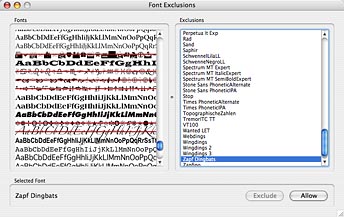
On the left of the Font Exclusions window, you will see the alphabet repeated over and over in the different fonts installed on your computer. On the right is the list of exclusions. The first time you run ASCIIsee, the Exclusions list will be blank.
If you click on one of the fonts in the font list at the left of the screen, you will see its name appear at the bottom of the window. To exclude a selected font, click the Exclude button. You will see its name appear in the Exclusions list. If you change your mind and want to allow the font again, click the Allow button. You can speed up this process by double clicking a font in the font list to toggle between allowing or excluding.
Any excluded fonts will appear in the font list with a red line running through them.
Some fonts which may be very difficult to read, such as an ‘Old English’ style, may need to be excluded to improve your image results. It is best to experiment.
Keep an eye out for ‘expert’ and ‘old style figures’ fonts. They often have unusual characters which may affect the readability of your final image.
Close the Font Exclusions window when you are finished. Your exclusions are automatically saved and will remain for subsequent uses of ASCIIsee.
Creating an image
Image creation is very simple. Just follow these steps:
Step
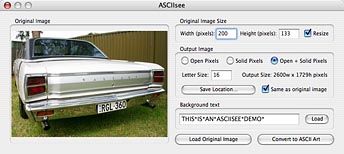
1. Click the Load Original Image button. Navigate to where your file is located, and select it. ASCIIsee will load the image into the Original Image window on the left of the screen.
Step
2. Type the text you wish to use as the building blocks for your image. Perhaps you want to send a personalized birthday or Valentine's message? When you type your message, you will notice that an asterisk (*) is substituted for a space. This is because a space would leave an ugly hole in the image every time it appeared. If you don't want to use an asterisk as your space character, you can select others from the ASCIIsee preferences window.
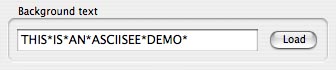
NOTE 1: As the personalized message is repeated, you should always place a space character at the beginning or end of your message. This way your message will read:
*HAPPY*BIRTHDAY*JOHN*HAPPY*BIRTHDAY*JOHN* etc.,
rather than:
HAPPY*BIRTHDAY*JOHNHAPPY*BIRTHDAY*JOHN.
NOTE 2: It is recommended that you use upper case characters for your message. Although lower case characters are supported, you will achieve better results when using upper case.
NOTE 3: A message of around fifteen or more characters is ideal. Shorter messages have a tendency to show obvious repetitions in the final image.
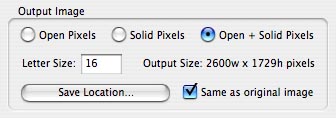
Step 3. Select the letter size from the Output Image section. This is the approximate height of the final characters in pixels. If you creating an image to send to someone for viewing via email or the web, it is not recommended to go below 10 pixels as your message may become unreadable. You will want to experiment with this setting.
NOTE: If you are using the demo version, your letter size cannot exceed 20 pixels.
Step
4. Decide whether you want to resize the original image. You will see the final output size of the image shown to the right of the Letter Size field. This is many times larger than the resolution of your original image. It is actually eighty percent of the image size multiplied by the letter size. For example, an image of 500 x 500 pixels, with a letter size of 15 will end up at 5,000 x 5,000 pixels (80% of 500 x 15).
If the output image will be too large, click the Resize checkbox at the top of the window, and type the new size into the width or height fields. The scaling will remain proportionate. You may find that your original image will end up scaled very small. This is normal.

NOTE 1: If you are using the demo version, and your image exceeds 70 pixels in either width or height, it will be automatically resized to 70 pixels.
NOTE 2: Some images won't provide very good results with the ASCII art process. Busy images, with little definable contrast won't work very well unless they are reproduced at large sizes. For smaller images, it's better to go with easily distinguishable shapes, such as faces or cars or pets etc.
Step 5. Select the type of output image. You have three options: Open Pixels, Solid Pixels or a combination of both. An image created with Open Pixels is made by using letters on a white background. This is the purest form of ASCII art, and is also the best for readability of your personalized message. Its drawback is that the images come out quite flat. They can still be very effective when viewed from a distance, but they may not give you the range of density your desire.
Solid Pixels are made by drawing a colored pixel onto the image, and then reversing the text out of white. This allows for a greater image density, but sacrifices the readability of your personalized message. It is also a bit of a ‘cheat’ method for the ASCII purists.
Open + Solid Pixels combines both of the above processes: Light shades are reproduced from open pixels and dark shades are reproduced from solid pixels. This method will give you the best density range for your final image.
You will want to experiment with these different options.
Step
6. By default, the final output image will be saved into the same location as the original image. If you want to change this, click on the Save Location button and select your desired output folder.
Step
7. The Output Format menu will allow you to select one of three image file formats (JPEG, TIFF and Photoshop). Select your preferred format.
Step
8. You are now ready to create the final image. Click on the Convert to ASCII art button. You will see a dialogue pop up, asking if you want to save the text for use in a future image. When ASCIIsee creates an image, it goes through every font in your system to measure the apparent visual density of the letters you have chosen. This process can take a while, so if you plan to use the same block of text over and over, you can save the text for use in other images.
If you wish to save the text, click Yes. If you only intend using this text once, click the No button. Clicking Cancel will cancel the conversion process.
NOTE 1: When saving the text analysis, you are only saving that specific phrase. If you make a change to even one letter, ASCIIsee will need to analyze the text again.
NOTE 2: The text analysis only applies to the output process you are using (open or solid pixels). If you change this setting, the text will need to be re-analyzed.
NOTE 3: To load a text analysis into ASCIIsee, click the load button to the right of the text field.9. ASCIIsee will now begin the conversion process. It starts with the analysis of the letters, followed by the creation of the output image. The time it takes to complete depends on the number of fonts on your system, and the output size of your final image.
NOTE 4: If you are using the demo version of ASCIIsee, the output image will have a small watermark at the bottom-left of the image. If you purchase the Unlimited version of ASCIIsee, this watermark will be gone.
IMPORTANT: Very large images, although very striking and effective, can take a long time to create depending on your computer's configuration.
|